Support
DVRs Setting[ MDx Series ]
- 1. How to set up Windows
- We recommend Windows 2000 or Windows XP.
With Windows XP, use C:\ disc for Windows only(over 10G) and use other discs for saving space.
Resolution of the monitor is over 1004x768. - 2. How to set up Firewall
-
In WindowsXP with ServicePack2, a firewall is installed as basic spec.
if you connect DVR with a remote system, the program below should be set, otherwise a connection can not be made.
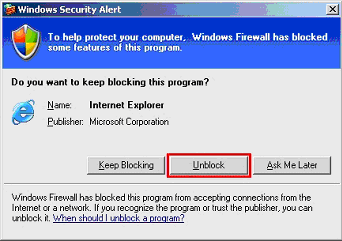
When DVR is first run, a warning sign is shown on the windows. Select ‘Undo preventing’, and it is free from firewall. If ‘Keep preventing’ is selected, ‘CnBDVR’, ‘CnBDVR Mediaserver’, should be added to ‘items free from firewall.
[How to add]
Click Start ->Control panel -> Windows firewall -> Exception - >Add program ->Search and then select and confirm the following program..
C:\Program Files\CnBDVR\CnBDVR.exe
C:\Program Files\CnBDVR\CnBDVR Mediaserver.exe
C:\CnBWeb\Server\Apache\Apache.exe (only when Web server is installed) - 3. VGA
-
We recommend ATI Radeon products (with video memory 32MB and up).
(Intel Extreme graphics, nVidia Geforce can be used)
It is not compatible with VGA of SiS chip system.
If you use Windows98, we recommend DiectX 7.0 and up. - 4. List of programs to be installed
-
DVR system(for recording)
- Picturing capture board driver
- DVR Main software
- Web server softwareRemote computer(remote system in network)
- Client softwareRemote computer (Internet explorer)
- When connected to DVR, ActiveX should be installed - 5. How to update programs
-
Before updating, close all the running DVR programs..
Download a new software from our website and install it using setup.exe file. If DVR software is already installed in your system, delete the old one. After the deletion, run setup.exe file.
Deletion of the old software doesn’t affect saved picture/sound. If you want to apply the existing setting value, you have to save it. - 6. How to save existing settings when updating programs
-
[How to save setting value]
Enter C:\Program Files\CnBDVR folder. Run BackupReg.exe and save the setting value.
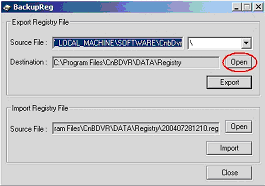
Click ‘open’ button in Export Registry File and select a location to save the setting value.
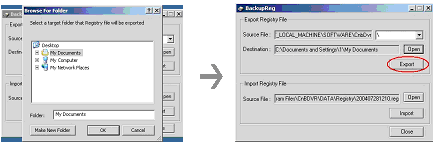
...........Click ‘Export’ and .reg file is made.
[How to retrieve settings]
Enter C:\Program Files\CnBDVR folder and run BackupReg.exe.
Click ‘open’ button in Import Registry File and select a file from the location where the setting is saved.


...........Click “Import” button and start ‘calling setting value’.
...........When finished, replace the current values with old ones. - 7. How to set up recording disc
-
Define the order of recording disc. If the space runs out, an automatic deletion is made in the order of from old one to new one.
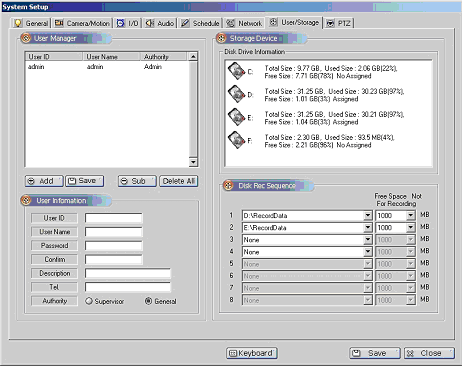
Click DVR program -> Set up environment -> user/record system and set up record disc.
Information of the disc of the system is shown..
Select the disc to be saved in recording order.
We recommend C:\ is used for Windows only.. - 8. How to change user ID and password
-
Click DVR program -> environment set-up-> user/record system.
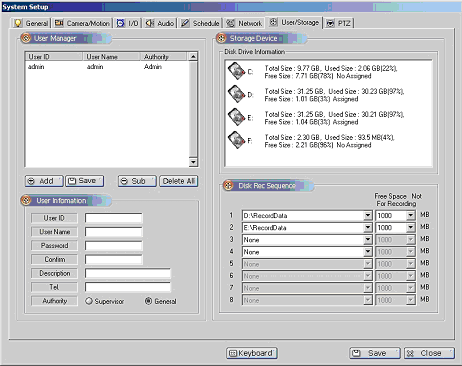
Input user ID and password and confirm password and select authorization and then click add button. Click save button and ID is saved.
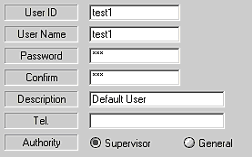
[Authorization ]
- manager : You can use the whole function of the system.
- General: You can only use limited functions and inspection mode. - 9. How to adjust the speed of recording
-
Click DVR program -> Environment set-up -> camera/motion.
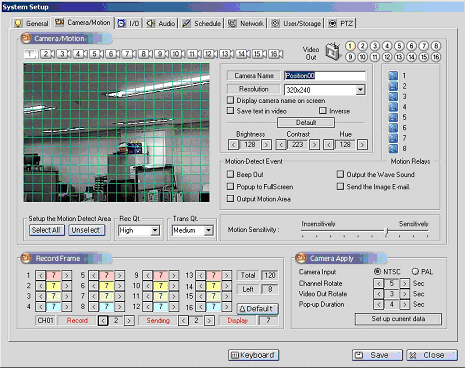
camera/record frame
You can allocate frames by checking the number of total frames and remaining frames supported by the system.
If you set up the maximum speed of each channel when you allocate the number of frames, a picture is displayed at the same speed.( BDS4824, BDS481 are displayed at Full speed)
Recording and transmission speed can be set up within the range of capture frame..

The channels of a camera can be checked by the numbers on the left and the maximum number of frames/sec can be set up by moving a button from right to left and back.

The numbers on the left indicate the number of total frames and remaining frames supported by the system. Click the default button and the average number is put in.

speed of recording
Set up the number of record frames for each channel(possibly within the range of capture speed)
speed of transmission
Set up the number of transmission frame for each channel (possibly within the range of capture speed)
speed of display
Set up the speed of display for each channel
- 10. How to set up motion recording
-
[Designation of range of motion]
To set up motion recording, a range of motion should be designated.
DVR program -> environment set-up -> camera/motion -> designate a range of recording.
The square block on the camera picture window indicates the designated range.

[How to adjust sensitivity to motion]
The sensitivity to motion can be adjusted by ‘Sensitivity control’ shown at the right middle of the figure below. Move the bar from right to left and back. When you get a setting value, save it.
[How to check sensitivity]
Select ‘Motion range output’ in the ‘Motion detecting event block’ and the camera reacts to motion and a blue-colored block appears the camera picture window at the left.
[How to set up the schedule of motion recording ]
DVR program -> environment set-up -> schedule -> select day by weekdays/weekends
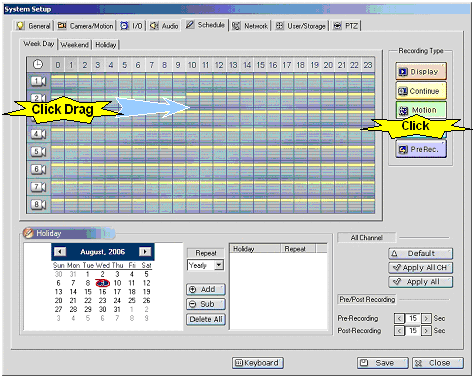
- 11. How to set up sensor recording
-
[Select a camera to be connected to sensor]
You can set up in such a way that when the sensor input is detected, the alarm output and camera are activated.
DVR program -> environment set-up -> sensor/alarm -> select the camera to be connected to the sensor

[Setting up the schedule of sensor recording]
DVR program -> environment set-up -> schedule -> sensor recording button-> select day by weekdays/weekends
- 12. How to set up De-interlace
-
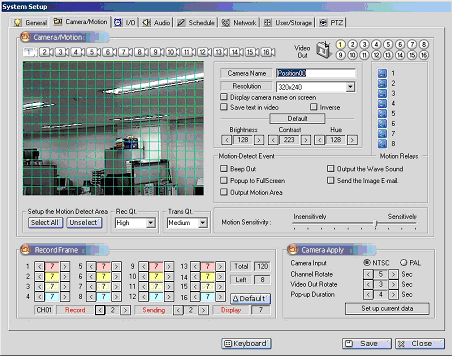
DVR program -> environment set-up -> camera/motion -> select De-interlaced resolution.
If a camera with over 640x480 resolution is not de-interlaced, there is a tendency of horizontal lines appearing on the screen. To prevent it, use 640 x 480 sw resolution.(some versions are not supported)
- 13. How to control PTZ
-
To control Pan/Tilt, Environment set-up -> PTZ/tracking
[Set up a model for PTZ]
DVR program -> Environment set-up -> PTZ/tracking -> select camera, PTZ model, RX address
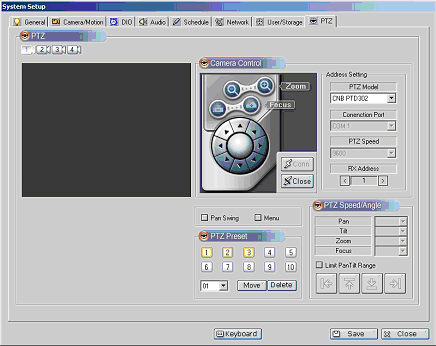
Select a camera channel connected to Pan/Tilt driver using camera button.
Select a type of PTZ in [PTZ model].
Connection port(COM 1,2…, RS485, RS422)
PTZ speed(PTZ의 communication speed)
Select RX address.
Click connection button.
Select Zoom, Focus, Pan swing, Tilt swing.
[How to control PTZ]
Use the PAN/TILT control button in DVR program.
Menu : indicate camera OSD
Zoom, Focus, Pan(left-right movement), Tilt(up-down movement) - 14. Controllable PTZ
-
CNB Camera :
AN(P)202, PTD302_D, PTD502_D, PTD302_P, PTD502_P, PTZ202, GN(P)600,
DRX502A(OLD), DRX500(NEW), DY_DSC_230S
PelcoD, PelcoP, WONWOO_PelcoD, Cynix_PelcoD
DiwaDmp23
Philips_TC8560
GC-755N(655N), GC-655N
ScanDome2(HSDN-251)
HRX-1000, ORX-1000
Panasonic_WVCSR854
Sensormatic
Kalatel
SmileCam
SAMSUNG_SCC643P
SANYO_SSPv1_3
LG_LPT_A100L
- 15. How to set up e-mail
-
DVR program -> environment set-up ->sensor/ alarm -> e-mail alarm-> e-mail set-up
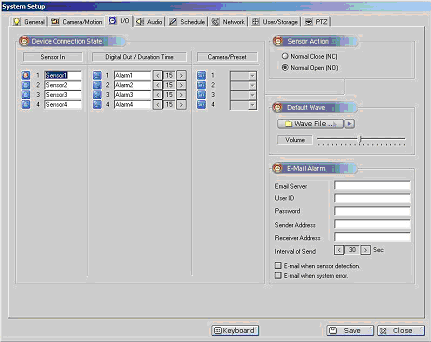
server address
Set up the address of mail server(SMTP).. ex) smtp.mail.yahoo.co.kr
(if SMTP server is installed in DVR, input 127.0.0.1)user ID
If a mail server needs an authorization, input user ID
ex) master (if SMTP server is installed in DVR, do not use)password
If a mail server needs an authorization, input user password.
ex)) ******** (if SMTP server is installed in DVR, do not use)sender E-mail
Input sender’s e-mail address. ex) dvrsyst@dvr.com
receiver E-mail
Input receiver’s e-mail address. Multiple receivers can be input using semi-colon(;).
ex) master@yahoo.co.kr; camsupervisor@naver.comtransmission interval
Set up transmission interval of repetitive event by second.
When a signal is detected, it’s delivered to E-MAIL.
ex) When a signal is detected, a message is delivered to E-MAIL designated.When a picture/disc error is detected, it’s delivered to E-MAIL.
ex) If the quality of pictures reduces or if there is a system error, a message is delivered to E-MAIL designated
[wariness]
If you use DVR SMTP server as e-mail server, some addresses may not work (hanmail.net, paran.com, empas.com … ) because if an unauthorized IP is used, a mail can be classified as spam and cancelled.
As DVR SMTP server is not supported, with Wndows95, 98(se), ME, different mail account should be used. - 16. How to set up Anti-Pirating function for pictures
-
To prevent the image data from being pirated, create a feature for each frame and insert it. You can check if the saved data has been pirated on play back screen or using anti-pirating software.
DVR program -> Environment set-up-> general information
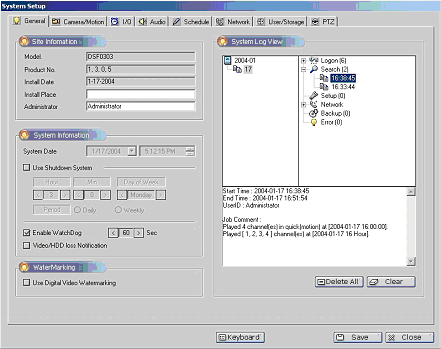
When you select ‘digital watermarking use’ on the picture below, anti-pirating function is set.
- 17. How to check if image data have been pirated
-
You can check if image data have been pirated using a software in CD.
Run VerifyWM.exe.
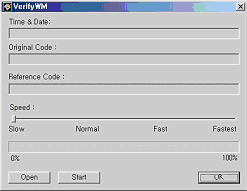
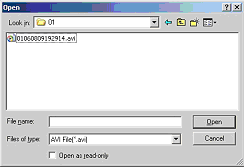
Select files to check and click ‘Open’ button and checking starts..
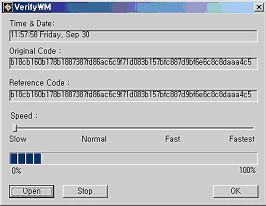
If the file is normal, the following message comes up.

If the file is affected, the following message comes up.

- 18. How to set up audio
-
You can set the system in such a way that audio recording and video recording can be done simultaneously. To record audio, sound card and other hardware should be installed.
DVR program -> Environment set-up-> Audio set-up window
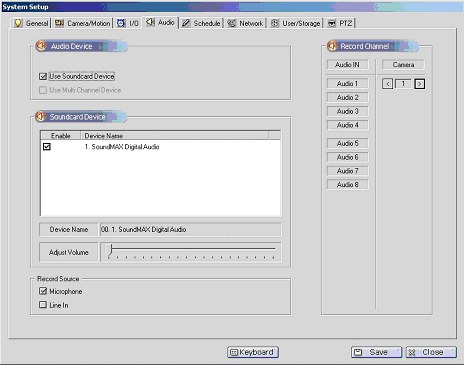

Select ‘sound card system use’ and select system to be used.
[Select audio input(how to select when a sound card is used)]
ㆍ Click ‘audio input channel button’ and click ‘camera button to be connected’ , and you can record sound and picture simultaneously.
For audio input, select either Mic or Line-in.

<How to connect audio line to sound card>
[When you select Mic]
(We recommend high sensitive mic with an amplifier because most sound cards don’t have amplifying function)

On the above figure, an audio connected to audio system 1 is to be synchronized with camera 1. [When you select Line-In]
(The left-input at Line-In terminal is for Audio 1, and the right-input for Audio 2)

On the above figure,
An audio connected to audio system 1(left sound) is to be synchronized with camera 1.
and an audio connected to audio system 2(right sound) is to be synchronized with camera 2.
[Setting up soundcard property]
You can improve the sound by setting up audio system as follows.
sound tap
Sound chart: No sound.
volume tap
Speaker set-up / high / quality
Hardware speed : max sample speed conversion: goodaudio tap
Play back volume - microphone / line input ‘mute’, volume ‘max’ Recording volume - microphone / line inputMicrophone high set-up: select Boost(a sound card with amplifier)
- 19. How to set up sensor/alarm
-
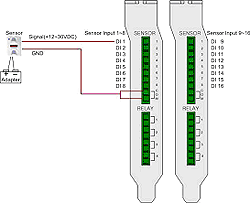
(sensor input)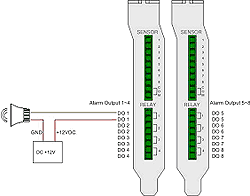
(alarm output)
[Sensor input connection]
Connect one line of each sensor(infrared, heat, magnetic) to the number of sensor and the other line to ‘common’. (For sensor input, “NC, NO”. For type set-up, Environment set up -> “DIO”, select “LOW, HIGH”.)
For power supply for sensor, use a transformer.
[Alarm output connection]
The power should be lower than 12V, 300mA. When you use apparatus driven by AC power like an electric lamp, use a separate relay. Not in operation, the condition of connection is “NO”, when a control output is in operation, the output connection is Close(Short).DVR program -> Environment set-up -> sensor/alarm -> select a camera to be connected to sensor.
When the sensor is activated, the alarm goes on for a set duration and the camera moves to preset position.

Alarm output can be set according to the movement of sensor and direct control.
- 20. How to back up data
-
Data back up can be done in the following order.
DVR program -> search ->back up data
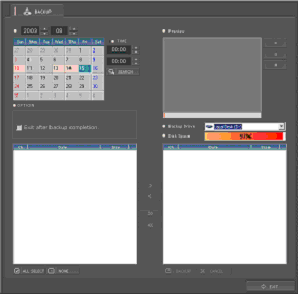
Data can be searched by date and time..
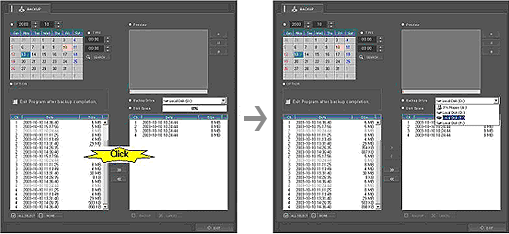
View the data to back up using ‘preview’.
Select the data and back it up.
If you back up data using CD-RW, Roxio Easy CD Creator should be installed. - 21. How to connect DVR to Client program
-
[Setting up and connecting Client software]
To connect DVR to Client software, DVR server should be registered.
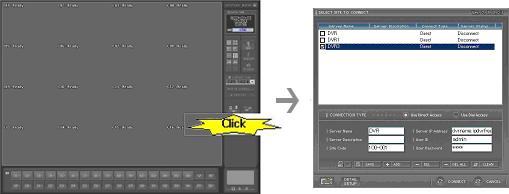
As shown in the figure above, run Client program and click ‘connecting button’ and a DVR server window comes up. Type server name, server connection code(100-001), IP address(IP or domain name), user ID and password, and click ‘add button’ and the server registration is done. To save the registration, click ‘save’.
Server name
Input server name to indicate a server.
Server description
Input details about a server.
server connection code
If a connection code is different from what a system manager set, connection can not be made(basic value 100-001)
IP address
Input server’s internet address, IP address or domain name.
user ID
Input user ID. If the ID is not valid, the connection can be made.
password
Input password.
Detail set-up
Numbers of different ports can be given to each server manually.
For detail set-ups like changing port, select server and click ‘detail set-up’ button.
To connect server, select DVR server and click connection “ ” button.
 - 22. How to set up an alarm for DVR in Client
-
[When camera input loss and motion detection happens]
Client program -> connection button-> Select DVR -> detail set-up -> select camera input loss and motion detection
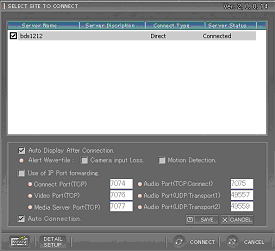
[Setting up event alarm using eMAP]
DVR program -> Environment set-up -> camera/motion -> motion detection event ->select alarm at Client DVR and a camera to be linked.
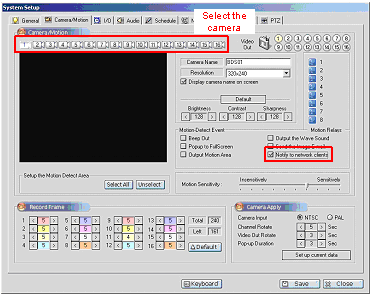
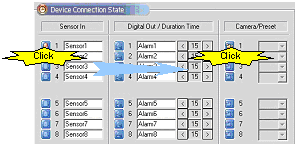
‘Event control’ should be set up to control events happening in client program..
[Map addition, Allocation of camera and sensor to map.]
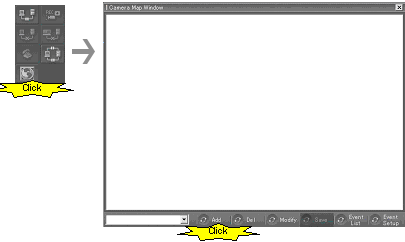
[Setting up ‘Event control’]
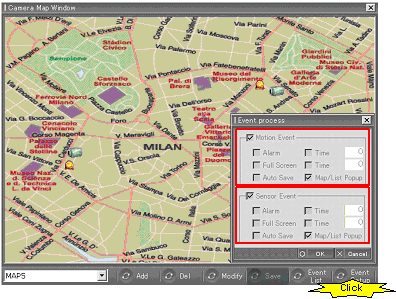
Click ‘Event control’ button and ‘Event control’ window comes up..
Motion event
Functions to control signals of motion detection
Sensor event
Functions to control signals of sensor detection
Alarm
When an event happens, produces an alarm sound through a speaker
(Alarm) timing
Sets up duration of alarm by hour/minute/second. If not set up, alarm goes on until whether an event really happens is checked.
Full screen
When an event happens, full screen mode is automatically activated.
(full screen/
recording) timingSets up duration of full screen by hour/minute/second.If not set up, alarm goes on until whether an event really happens is checked.
Automatic recording
Records pictures automatically when an event happensSets up duration of recording by hour/minute/second.. If not set up, recording goes on until whether an event really happens is checked.
Map/list appearance
When an event happens, map and list of event automatically comes up.
- 23. How to connect DVR to IE(Internet Elplorer)
-
To connect DVR using IE(Internet explorer) DVR system should have DVR web server installed in DVR system.
DVR program -> environment set up -> network -> set up ‘web client support’
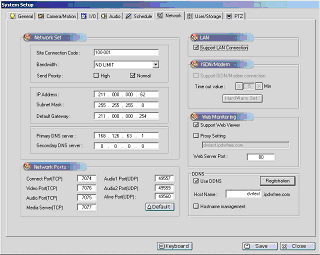
Call the IE from a remote system and input IP address of DVR server or ‘domain name’ and click ‘go’ and a Log-in window will come up. .
ex) http://211.0.0.0 或 http://dvrname.ipdvrfree.com
With webport 8080 : http://211.0.0.0:8080 or http://dvrname.ipdvrfree.com:8080
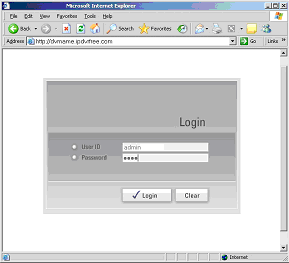
Log in and you can see pictures in DVR.
When you connect the system to DVR for the first time, you have to install ActiveX which normally takes a few minutes.
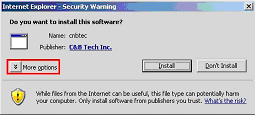
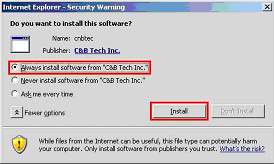
Click ‘Installation’ when ActiveX installation message comes up. (Once installed, a ‘picture monitoring window’ appears every time the system is connected.)
- 24. How to utilize DDNS service
-
If a changeable IP is used DVR, you have to confirm IP every time you connect and to avoid the inconvenience DDNS is used. Using DDNS, you can connect the system to DVR by ‘domain name’.
[Setting up DDNS at DVR]
DVR program -> environment set up -> network -> set up DDNS service’
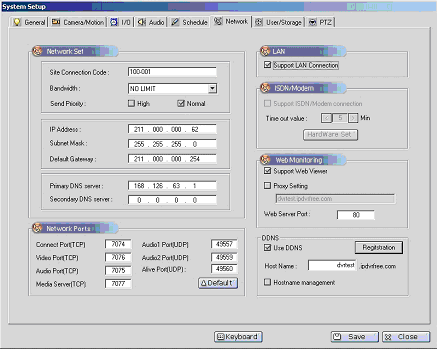
[Creation of host name]
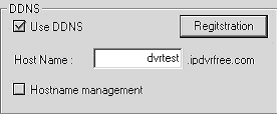
Click “DDNS use” to activate the related controls for registration..
Type the name of host and click ‘register’ button( alphabet [a~z], number[0~9], hyphen [-] can be used for name)
If registration is done correctly, the following message comes up.
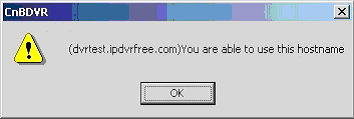
Click “Confirm” button and the click ‘Save’ button and the registration is completed.
[Host name management]
General users don’t need to use ‘Host name management’.
System managers who have to manage DVR lists in DDNS homepage need to use it.
Refer to DVR installation manual as to how to manage DVR lists.
[How to connect to DVR using domain name]
If a correct registration is made for DDNS service, a connection to DVR can be made by domain name.
1) How to get connection using a client software
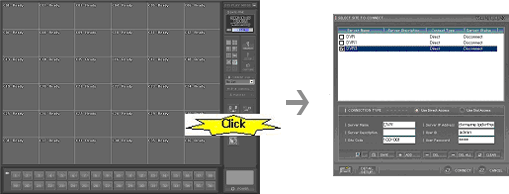
As shown on the figure, run ‘Client program’ and click ‘connection’ button, and DVR server window will appear.
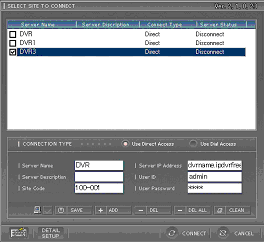
Type the name of domain in ‘IP address’ in a ‘server connection dialogue box’.
2) How to get connection using the web
Connect the name of host to the address of IE(Internet Explorer)
(for detail, refer to the software manual)
ex) address : input http://dvrname.ipdvrfree.com (basic webport)
With webport 8080 : input http://dvrname.ipdvrfree.com:8080
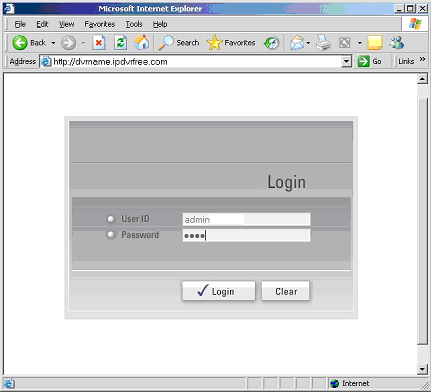
- 25. How to set up IP(or Router)
-
If DVR is connected to IP(router), you should set up a port-forwarding function at IP(router). If DVR is directly connected to internet without IP(router), setting-up of port-forwarding function is not needed. On the chart below are ports to be used in DVR and a user can modify them.
*List of port for port-forwarding
Refer to Router or IP manual for setting up port-forwarding.Function Type Port number Web port TCP 80 Connection port TCP 7074 Audio port TCP 7075 Video port TCP 7076 Media port TCP 7077 Audio1 UDP 49557 Audio2 UDP 49559 Alive port UDP 49560
If individual IP is used, ‘Proxy’ should be set up.
DVR program -> environment set up -> network -> web monitoring set-up -> save proxy set-up
DVR program -> environment set up -> network -> Input IP address, and domain name if DDNS is set up.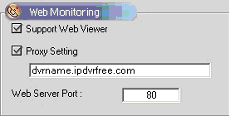
[wariness]
If DVR is connected to IP(router), you should set up a port-forwarding function at IP(router). Refer to Router or IP manual for setting up port-forwarding.
If the standard ‘web server port’ is not used, change ‘web server port’.
- THE COMPANY Company overview Greetings from CEO Vision CI R&D Company location
- PRODUCTS ALPHA 300 (IPC & NVR) ALPHA HD ANALOG VIDEO WALL & DISPLAY VIDEO INTERCOM & ACCESS CONTROL DISCONTINUED
- SUPPORT Purchase Information Technical Support Q & A Download Center
- PR LOUNGE Press Release Photo Archive
- PARTNERSHIP XNET Alliance Partner Dealer Application

- Tel: 82-2-2624-2469 Fax: 82-504-135-9319 E-mail: cnbgtech@cnbtec.com
#1302 13F, 1130, Beoman-ro, Geumcheon-gu, Seoul, Republic of Korea.
@ CNB Technology, Inc. All rights reserved.
